If you want to get the most out of your mix, try mastering with Ozone 12, or at least give mastering a little more attention than just sticking a limiter on your master bus and turning up the gain knob. If you decide to give mastering with Ozone 12 a shot, here are the 5 basic steps I go through for every master.
Even though my software of choice for digital mastering is iZotope Ozone 12, Ozone’s main “modules“, are actually universally available in any DAW, even the one you used for your production. In this post, I’m going to list the 5 modules that I use for every master.
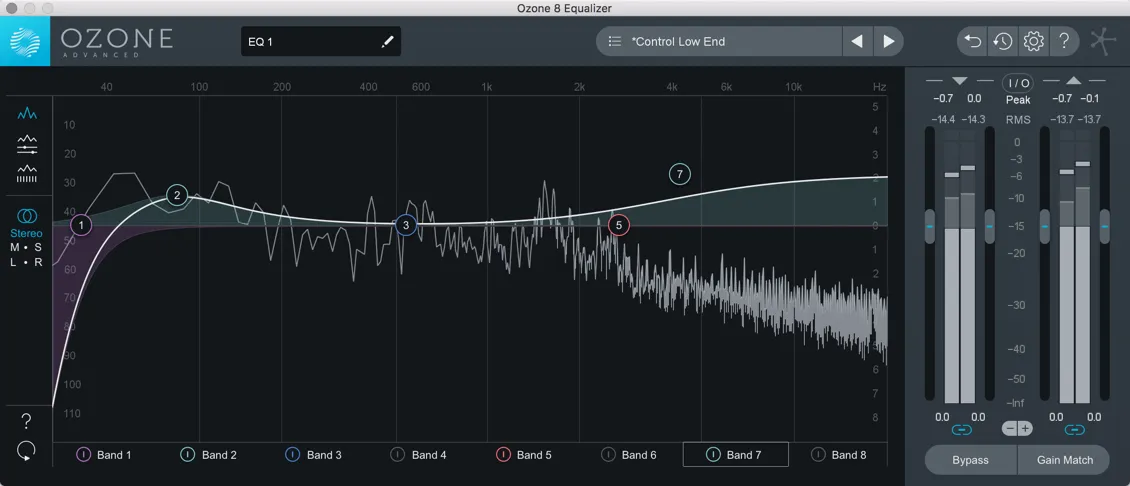
Ozone Equalizer
The first step in mastering is to clean up unwanted frequencies. This will often include a high pass filter at a very low frequency below the human hearing range. The equalizer in Ozone has a very neat trick where if you hold down the ALT key and move your mouse through the spectrum while the music is playing, it will isolate the bandwidth to the frequency you hover over. This is a great way to find problem frequencies that you’ll want to attenuate.
If you’re not using Ozone, you can emulate this trick by setting a really narrow Q-value to your band and sweeping it across the spectrum until you hear something unpleasant you want to cut. Remember to cut narrow, and if you have to boost, boost wide.
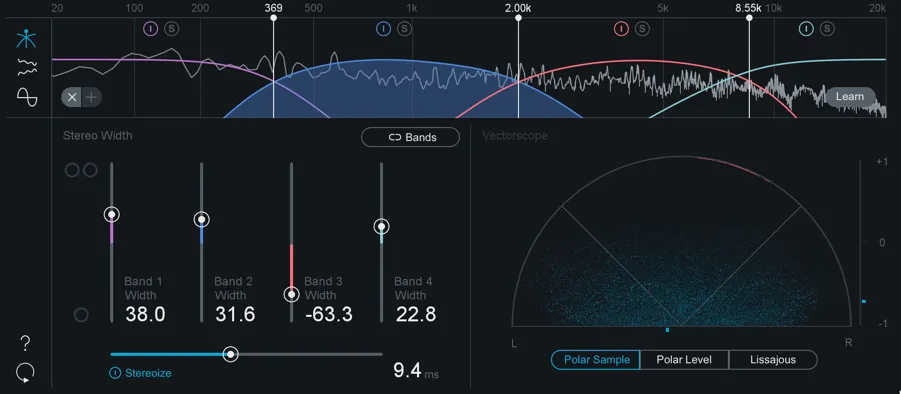
Ozone Imager
Once you’re happy with the overall sound signature, I recommend adding the Imager module for two purposes. Firstly, to clean up the low end by drastically reducing its width. To simplify, lower frequencies whose wavelength is larger than the distance between human ears lose directionality. So having a wide-sounding low end will most likely not have any contribution to your mix other than muddying up the sound.
The other thing you want to do with the Imager is turn up the width on your high end. It’s very subtle but it makes the entire mix sound wider and slightly more exciting.
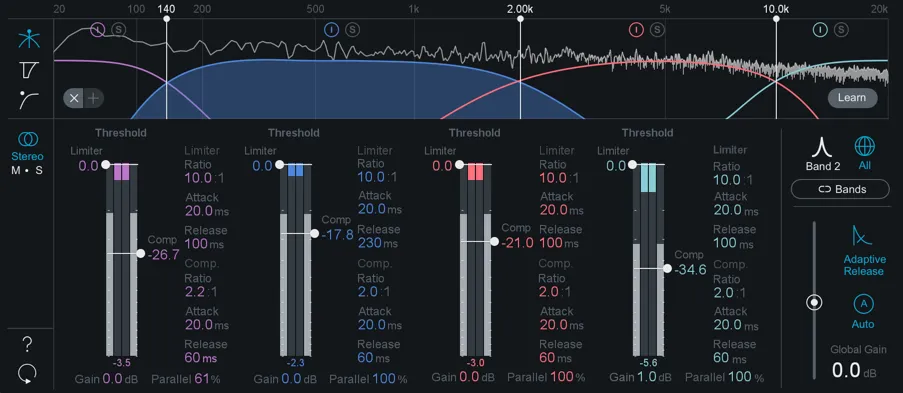
Ozone Dynamics
You may recognize this module from your DAW as a multiband compressor. The idea here is to get a more smooth and balanced tone. The template I’ve saved as a starting point has a ratio of 2:1 on all four bands, and I aim for a 1 to 2 dB reduction for the loudest parts of the song. I like to go for a transparent master that’s sympathetic to the mix, but if you want to be a little more aggressive you can turn up the ratio to 3:1.
If a certain frequency range is lacking in the mix, you can give it a slight boost to it during this phase.
iZotope Vintage Tape
This one is optional, you can use it if you’re going for a warm analog-sounding master. What it does is essentially add a bit of saturation to the sound. If you want to emulate this in your own DAW, you can instead add a very subtle distortion and compression to your master bus.
Ozone Maximizer
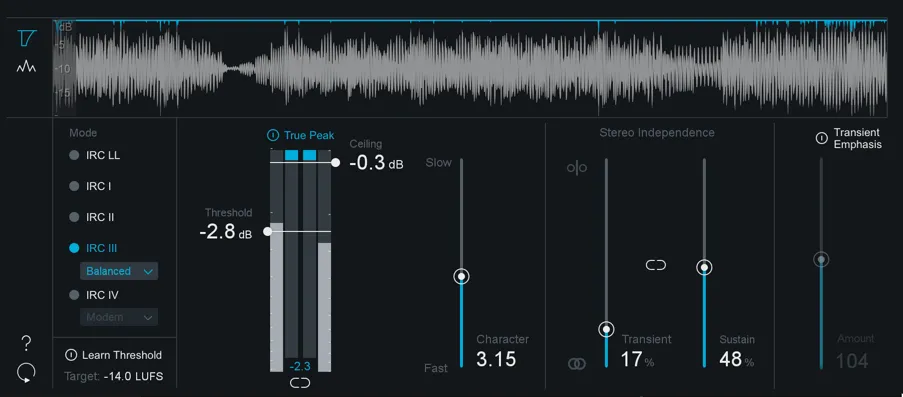
This is where the magic happens, Ozone’s Maximizer module is essentially a glorified limiter plugin that’s designed to maximize the perceived loudness of your audio track while maintaining clarity and preventing distortion.
Unlike a traditional limiter, however, the main control knob is a threshold meter that you turn down, instead of a gain knob you turn up.
If you want to preserve the dynamic range of your mix, keep an eye on your gain reduction and try not to go over 1db to 3db of gain reduction for the loudest parts of the song.
I’d also recommend leaving the Ceiling parameter at -1 dBTP, with the Maximizer set to measure true peak rather than sample peak. That’s a working default rather than a law — there’s more on where it matters and where it doesn’t below.
How Loud Should Your Master Be?
Every major streaming platform normalizes playback, which means the loudness war is over at the listener’s end. Spotify, YouTube and Amazon Music all play tracks back at roughly -14 LUFS, and Apple Music’s Sound Check sits nearer -16 LUFS. LUFS is a measure of perceived loudness across the whole track rather than a peak reading, and Ozone shows it live while you work. Platforms do adjust these targets from time to time, so it is worth checking the current specs before a release you care about.
This changes what the Maximizer is for. If you master at -8 LUFS, the platform simply turns your track down to sit level with everything else. You do not end up louder than anyone; you end up with the dynamics you crushed to get there and none of the volume you crushed them for. Aiming somewhere around -14 to -10 LUFS integrated keeps you competitive without flattening the mix.
The other number people argue about is true peak, measured in dBTP. Your peak meter reads the samples; a true peak meter estimates the waveform between them, which is where a signal can go over without the sample meter noticing.
Spotify publishes two figures, and they’re the opposite way round from what most people repeat. If your master sits at or below -14 LUFS, they ask for -1 dBTP. If it’s louder than -14 — which yours almost certainly is — they ask for -2 dBTP. Stricter for the loud ones, not looser.
Almost nobody does this. iZotope measured a batch of Billboard chart tracks and found an average of -9.2 LUFS with true peaks running from -0.33 all the way to +1.33 dBTP. Several were over zero. That isn’t carelessness — plenty of mastering engineers deliberately let peaks over, because a couple of dB of clipping on transients sounds better to them than the dynamic range they’d give up limiting it down.
The reason they get away with it is worth understanding, because it tells you when the rule actually applies. When a platform normalizes a loud master down, the peaks come down with it — a -9 LUFS master at +1 dBTP is being turned down about 5 dB at playback, so those inter-sample peaks land nowhere near clipping by the time they reach a speaker. Spotify says outright that negative gain adds no distortion.
Where it does cost you is the case nobody mentions: normalizing up. Spotify holds back 1 dB of headroom when it lifts a quiet track, and their own example is a -20 LUFS master with a -5 dBFS peak getting raised only to -16 instead of -14. So a quiet master with tall peaks doesn’t get the volume it should. It just plays quieter than the track next to it.
What I do: leave the ceiling at -1 dBTP with the Maximizer set to measure true peak. Not because a master that touches 0 will fall apart — the evidence says it won’t, on anything that normalizes — but because it costs me nothing I can hear, and it keeps the master honest for the places normalization isn’t running: downloads, DJ software, someone playing it back with normalization off. If you’re chasing a specific sound and a few tenths of a dB of clipping is part of it, that’s a legitimate choice and you’re in good company. Just make it a choice rather than an accident.
Use a Reference Track
Another handy tool Ozone offers is reference function, where you can add your favorite sounding track, switch between them by the click of a button, while watching both of their frequency responses on the audio spectrum for a more visual comparison.
Mastering with Ozone 12
Bear in mind as with everything in music, there’s no right or wrong answer. Feel free to challenge every rule once in a while and try something new. Take frequent breaks, come back and see how you feel about the resulting sounds then rinse and repeat. Once you’re done with the mastering, your track is ready for release, and the work moves from how it sounds to whether anyone hears it. A Spotify Canvas gives the track a visual on the platform most of your listeners are already using, Facebook and Instagram ads can put it in front of people who have never heard of you, and a lyric video gives you something to post everywhere else.
Promote Your Music with a Lyric Video
Mastering your track is just the first step toward making your music shine. To truly captivate your audience and stand out in a crowded music landscape, pair your polished sound with stunning visuals.
A custom lyric video produced by an artist can help you grab attention and turn casual listeners into loyal fans. Whether you’re promoting a single or launching a full album, the right visuals can elevate your music to new heights.
Ready to bring your music to life?